Saturday, November 19, 2011

Shake(down) It Up!

Well, it's the day after the big Shakedown #3, and I must say, it wasn't too bad. Was it uneventful? No. Was it a disaster? No, not really! Was it fun and insightful? Hell yes.......

What was nice about it was that twelve of my long time, good model RR pals (and my dad, too) came over after bad weeks at work, long rides and siting in traffic to come not only celebrate that the RR was finally running fully, but to celebrate my 42nd birthday. We had a lot of good natured ribbing, and a lot of very good critiques that will help me fine tune the layout for an even better Shakedown #4 in early 2012.

Not too many really "horrible" issues need to be addressed to allow the RR to run smoothly and as planned, and they can be fixed relatively quickly and cheaply, or so I think! Basically, track guage problems (we fixed the issues of verticle curves last time), some minor electrical issues, and a big one, shop the car fleet so all cars are equipped with Kadee #5's, metal wheels and are properly weighted. That however, is a project that is lengthy and will cost quite a few dollars, so that will most likely take place over much of 2012.

I don't have any pictures that I took last night (though friend Dave Ramos did, and as soon as he e-mails them to me, I'll add them to this post), so instead I went downstairs after I got home tonight after a day of model RR'ing in Connecticut, to show you a bit more of the layout, 'cause everybody like pictures, right? RIGHT?

Ok, so first off are the four carfloats that drive the east end of the layout. The two in back are permanently mounted to their float bridges (Walthers car float and custom kitbashed float bridges) and handle the interchange traffic between the trunk line RR's, and the two moveable (on a cart, and more on this in a future post) carfloats with no float bridge model installed yet, that primarily handles the station floats going to the pier stations. These float bridges represent four of the six that were actually at Jersey City.

Next, here are two long shots, the first looking west along the length of the yard..........


.....And then east towards the "river". This yard is two feet wide and about 14 feet long long. I have been lucky enough to have a RR valuation map of this yard, AND the ability (ie: room) to model it (almost) track for track, turnout for turnout, though it is compressed in length. This yard was one of the places the guys suggested changes in the way the turnouts are located to make switch moves easier. I am willing to make these changes even if they are not "prototypically correct", if they will make the operation easier and thus enjoyable.


Here's what I have effectionately named "The Crossing of Doom". This the eight diamond crossing of the LVRR main, the LVRR wye, and the CNJ's Henderson Street branch (upper left to lower right). Did I mention I am modeling the CNJ, too? Yeah, just a short branch with about nine industries that was also in this part of town. And this crossing was just too cool to pass up! The reason the base of this looks different is because last year we tore it up and rebuilt it on a piece of Gatorfoam board, because as built on the foam, not only was electric continuity poor, but there were also a TON of verticle curves due to the less than stellar foam base (one instance where it was NOT OK to build your layout upon foam!). It still needs tweaking (the Atlas crossings need to be checked for guage and smooth tracking), and some electical "issues". Problem is, it needs to come out in order to be easily worked on, and it was kinda a pain in the @$$ to put it in to begin with!


Did I mention the CNJ? well here we are at the EOT of the Henderson Street Branch at the US Gypsum plant. I just taped a few of my Walthers kits together in order to give the guys some semblance of what is what, and most importantly, gave it a "name" tag. Also, you can see we like to ignore rule G on this layout (even when it's not somebody's birthday) and also the use of wooden skewers to not only to uncouple cars, but also act as train brakes!

I've got a few more to share, but I'll follow up with some more before Thanksgiving, 'cause it's dinner time right now here in New Jersey, and I'm hungry! If you have any questions about the above, feel free to ask!

Thanks for checking in,

Ralph
Tuesday, November 15, 2011

Op Op Till You Drop - The Paperwork

Well, with T-minus 4 days and counting till my big shakedown (this is the one that will tells us weather or not I can go "prime time" with regular op sessions starting in February/March 2012), I am hurredly prepping the layout and the room, but more importantly, making sure the paperwork is all in order.

To me, not only is having the proper paperwork available to your crews VERY important to almost any layout, but having the proper paperwork (in my case, of a prototypical nature) helps not only guide the operations but also set the theme. Paperwork, at it's very least, should be car cards and other diagrams to help spot cars in sidings, etc, etc., but I'm one of those kind of guys who like to go all out. Like my very good friend Dave Ramos and his New York Harbor Railroad (www.nyhrr.com) and other hobby notables like Tony Koester and RMC author Tony Thompson (http://modelingthesp.blogspot.com/), we believe more is more! This goes beyond car cards and waybills (we've "invented" our own to be just like the real thing), to car tags, interchange logs and the like.

I've presented NMRA clinics on the subject over the last 6 years, and I have refined my forms to something that is both modelable and usable without being overly complex. Which brings me to the point that most people look at paperwork as an over-complication of things. Some people think of paperwork (past the old CC&WB system) as "taking work home with them", and are of the mindset that "I want to run trains, not push paper". It's perfectly understandable - Not everyone is a prototype modeler, nor wants to run their  layout in a prototypical manner, and just wants to watch their trains run round and round - If that's what makes the hobby fun for them, so be it. However, in the circle of friends I operate with, there is always at LEAST three non-train operating jobs available  In fact, I think I've run maybe five train jobs on my friend Dave's layout over the space of four years and at least thirty op sessions! Why? Well, I enjoy it (obviously!), and I enjoy the mental gymnastics of replicating the realistic movements of cars, without having to do all the billing that the real clerks once had to do! It's no different to me than a Civil War reenactor making sure to have all his period-correct (and especially in relation to what we're doing, specific) accoutrements on and with him and no modern gizmos anywhere in sight, with the goal of setting the theme. OK, maybe most of us model railroaders aren't as obsessed with the details (I know I use mechanical pencils, highlighters and sticky notes to help me), but I think you get my drift, or at least I hope you do!

So, back to the point of my post.......I've been printing out tons of waybills, empty car orders, swtichlists and other such items for Friday. I know, I know I don't need to have EVERYTHING in place (it's only a shakedown, after all) but I still want to make sure it's available to the guys and if there IS a question on how to indentify or do something, I want to be able to provide that answer or job aid. So, below are a couple of forms I have created (all designed from prototype forms, though not always LV or CNJ-specific) for your consideration, and in a followup post, I'll get into talking more about the rather esoteric or layout-specific ones.

This first card is an LCL car "tag", designed after an actual PRR tag. These are the kind of tags that would have been found on door tack boards. Tony Thompson recently posted in his blog about the SP's use of such tags. While I have found no actual LV tag, I feel that I  am still being prototypical by using an actual piece of paperwork that could have for all I know, been used by the LVRR, too.


This second form is patterned after an actual LV train manifest form, T-156 if I recall correctly. Here, I have re-purposed it to serve as a tool for my active staging crews, to help them make up trains and carfloats correctly by car type, no by destination.


Here's an Empty Car Order, patterned after an NKP form. Pretty self-explanatory.


Here's a terminal spotting card, patterned after LIRR, NH and PRR forms. Since I don't use CC&W's on the layout, this takes the place of, and serves as, a way to keep track of on-layout deliveries.


And the last one for now, this is a a modified version of a form that friend Dave Ramos designed for his layout to provide crews with a "train brief", telling them their train make up and what they are expected to do.

As you can see, there's a lot of paper planned for this layout of mine! But it all supports the operation and will hopefully not only support the theme, but more importantly support the operation and make it enjoyable for all. I realize that in the process of posting these, that some of these might not be very legible when clicked on, so if anyone is interested, post a comment and I can send you the file direct if you're interested in learning more.

Until next time,

Ralph

Friday, November 11, 2011

Getting Ready For The Next Shakedown

Well, last night was yet another productive step towards next week's shakedown, when friend Ted DiIorio and new friend Jim Fawcett came over to help me set some Blue Point switch "machines" in place. A few curses, and a whole lotta holes drilled in the plywood and foam later, and we installed 9 BP's. While I have no photos to share of last night's work (pretty boring to look at if I did, anyway), I instead bring you a photo or two of last weekend's work on the big coal trestle.


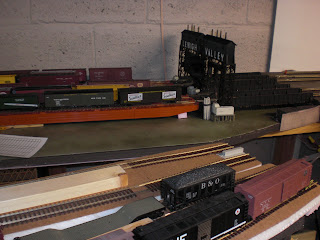
This is the "temporarily permanent" John E. Dale coal trestle on The layout's Edgewater Branch. The foamcore mockup was drafted by friend Jay Held from a grainy aerial of the actual building, (see below) and of a nice 3/4 view of a similar building located in Irvington, NJ on the LV's Irvington Branch. The "givens and druthers" for the building were to hold enough 34ft hoppers to make it a viable industry (10 became the magic number), to not have the benchwork extension come out too far into the basement's "layout free" space (as seen in the top photo), and not to crowd out the tracks to the one side of it (as seen in the bottom photo). I think we got a nice stand-in, certainly better than nthing, like it has been for the last 8 years! It took about three work sessions, between bumping out the benchwork not once, not twice, but three times to provide adequate room, and to give Jay enough time to draft a decent drawing in CAD (he's a stickler for detail!).

We shall see how it goes - It gives me even more "play value" to an already busy industrial branch with seven medium to large industries, and now I can run an extra "coal train" just to deliver coal to the trestle and to local industries.

Before I log off, here's that aerial view I spoke of above...Sorry for the blurry view, but the website HistoricAerials.com doesn't allow for clear and/or non-watermarked shots.


Until next time,

Ralph

Thursday, November 10, 2011

There used to be an empty basement here.........

I figured I'd start by showing some photos of the beginnings of the layout, not long after I moved in during 2002 for my second post.

I was not one for "properly" preparing the room (at least as far as the hobby press and so-called hobby masters will tell you that you need to do) to be ready with sheetrocked walls, suspended ceilings, masonite backdrops, and recessed lighting (of the proper light type, mind you). I DID however, paint the floor, fill any divots in the poured concrete, and water seal the lower half of the walls before any benchwork went up - And that was because my girlfriend said I had to! I wanted "minimalist" benchwork, and for it to go up quickly - I wasn't going to need to stand on it, so it didn't need to support me, and I wanted it done inexpensively and somewhat modularly, in case I ever need to take it apart. I think I have somewhat achieved that through the use of expaned foam (instead of plywood, OSB or Homasote), and a lot of trial and error......

As they say, a picture is worth a thousand words, so I'll let the photos do the talking, and then follow up on them if there are questions or things aren't too obvious.

Here's the right side of the room after painting. As you can see, I started right away using scap wood to lay out a footprint, though this was far from accurate. I never did develop a "real" track plan, though I did plot out the table to scale on graph paper. I knew I had a finite amount of room (11 ft wide by 20 ft long), so I made the railroad fit within those constraints. I am lucky enough to have track maps (Sanborn and RR-issued valuation) for this area, so I knew where the tracks were, even if I couldn't fit them all in. I wanted to focus on the main yard and the junction (but we'll cover that in future posts).


Benchwork as basic as it gets! 1/4 inch Luan on top of 1x2 and 2x2 framing. In some spots, this got very convoluted as things went along. (in my defense, this was my first solo benchwork experience, and done without any input, so I take full responsibility!) In some spots, it got so bad, I call it "Frankenlayout"!

Here we are, turning to our left, looking down the length of the main LVRR yard from the back of the layout. This view is now blocked by a backdrop (a future post). Of special note is the overhead cabinet/valence I also designed into the layout (and yet another post!).


And for now, last but not least, a sea of pink! As I said above, the entire layout is covered by it, with the track laid directly upon it. Since this was all yard/industrial trackage, there was no need for ballast/roadbed profiles. To save money on buying turnouts I wouldn't need (though in the end, I still did!), I made photo copies to see what would fit. In the view taken here (about 5 years ago), the trackwork is still pretty much the same, though it has been re-aligned about four times since then! This view is also taken from the opposite direct as the last one, looking "railroad west", with the backdrop now in place.

Well, I know this has been a lengthy post, so I'll stop here. I have probably generated more questions than answers, but I'll get to them!

Welcome to the Lehigh Valley Harbor Terminal's New Home!

Hello! I'm Ralph Heiss, I'd like to welcome you to my HO scale version of  the Lehigh Valley Railroad's New York Harbor operations, set in 1951 on the Hudson River in Jersey City, New Jersey.

I was recently inspired by my good friend Ted DiIorio and his own Ma&Pa Blog (http://maparr1943.blogspot.com/) to finally bring my layout and all the work that has been done to a bigger audience, other than my current Yahoo Group and Facebook pages. What I'd like to "bring to the table" here is some of my experiences and construction techniques (and failures!) in the 8+ years that I have been working on the layout. I'll follow up shortly with some prototype history, as well as some layout stats, and of course, lots and lots of pictures.

So with that being said, please come on up to the wheelhouse of the Lehigh Valley's tugboat Cornell, and join me as we navigate the rails and water surrounding the NJ/NY waterfront circa 1951, in 1/87th scale!

Ralph Heiss